
Ignition Installation Troubleshooting Tips/Frequently-Asked Questions
Warning: Reversing the red and black ignition wires will
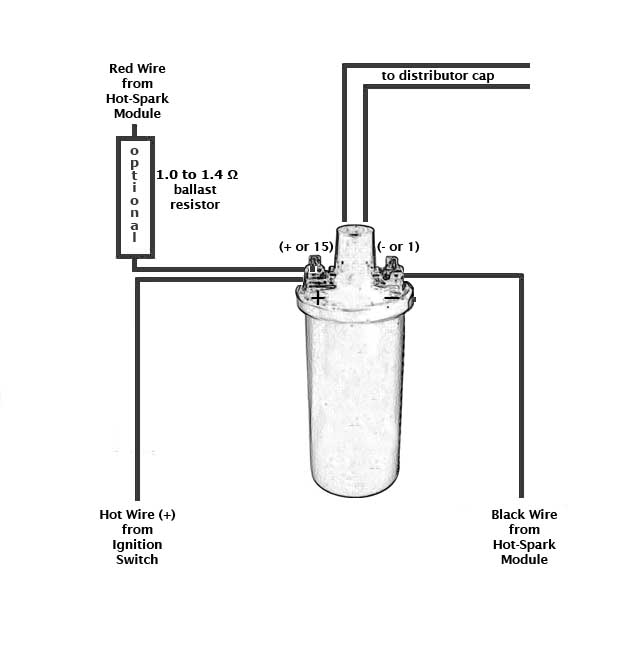
destroy the ignition module and void the warranty. The Hot-Spark module’s red
wire connects to positive ( + or 15 on Bosch coil). The black wire connects to
negative ( – or 1 on Bosch coil). Connect any other wires to the coil in their
original positions. This ignition module is designed for 12V negative ground applications
only. Do not connect either of the coil's terminals ( + or - ) to ground
(earth). Voltage, measured at the coil's + terminal, must never exceed
13.9 volts at high RPM levels.
Too much voltage going to the coil's + terminal can cause the ignition module to
overheat and run erratically or fail.
Customers occasionally return ignition kits to us that have failed. In the great
majority of cases, it is the result of misuse, reversed or improper wiring or
problems with the vehicle's electrical system (e.g., low voltage) and not the
fault of the ignition kit. Here are the most common causes of failure (in the
following order):
1. Key is left on without the engine running. If the engine happened to stop in
a position similar to points closed, the ignition module will continue charging
the coil without the coil's discharging, resulting in excessive heat buildup in
the coil, which can fry the ignition module and/or coil. As a general rule,
don't leave the ignition switch in the ON position for more than a minute or so,
without the engine running. If the engine happened
to stop in a position similar to points open, the ignition module/coil circuit
would be open, no current would flow, and there would be no damage to the
electronics.
2. Coil Required: Do not use a low-resistance coil that does not have the
minimum primary resistance required by the ignition module, as stated in the
instructions (minimum 3.0 ohms for 4- and 6-cyl or 1.5 to 2.0 ohms for 8-cyl, assuming
a 12-Volt electrical system). The coil resistance regulates the current in the
ignition module/coil circuit. Too little coil primary resistance resistance
results in too much amperage going to the ignition module, which can overheat
the electronics. The failure may not happen immediately, but the excess heat
will shorten the life of the ignition module electronics. How long the
electronics will last depends on how much heat is generated. It could be a
matter of a couple of hours to a few hundred hours, depending on temperature.
To measure primary resistance: Label and remove all wires to coil ( + or - ).
Using a common digital multimeter in the 200 Ω mode, cross the red and black
leads of the Ohmmeter. Allow 10 seconds or more for the reading to settle and
write down the reading. Still in the 200 Ohm mode, measure between coil’s + and
- terminals. Allow a few seconds for the reading to settle, until it stabilizes.
Subtract the previous reading, taken with the leads crossed, to compensate for
Ohmmeter’s inherent resistance. Do not use a low-resistance coil, such as the
MSD or Accel coil; they don’t have enough primary resistance for this
application. For best performance, the coil should also have 7K Ohms or more
secondary resistance (measured from coil’s + or – terminal to center high
tension terminal, in the 20K Ω mode of the Ohmmeter).
Ballast Resistor: If the coil's primary resistance is not quite enough or
is borderline, you can wire an external ceramic ballast resistor (with 1.0 to
1.5 Ohms resistance) between the coil's + terminal and the red HotSpark ignition
wire.
3. Polarity reversed when wiring the ignition kit (i.e., wiring the ignition kit
to the + and - terminals of the coil, backwards). This will fry the ignition
module's electronics immediately. The red HotSpark wire should go to the coil's
+ terminal and the black HotSpark wire should go to the coil's - terminal.
Finally, it is possible for an ignition module to fail on its own, but this is
the case in only a very small percent of the ignition kits that are returned.
About 90 per cent of returned ignition kits usually test to be working
perfectly, indicating a problem with the vehicle in which they were installed,
improper wiring, bad connections or not setting the timing correctly with a
stroboscopic timing light. Of the ignition modules that have failed, we can
usually trace the reason to one of the causes listed above.
A few other common installation problems are:
1. Corroded and/or loose ground connection, either at the battery terminal or at
the other end of the ground cable, where it makes contact with the vehicle body.
Loose wire connections or poorly-spliced wires. The wire grounding the breaker
plate, in vacuum-advance distributors, is not connected or has a loose or
corroded connection.
2. Magnets in magnet sleeve not aligned vertically with the ignition sensor,
because the distributor shaft is not shimmed properly, the rotor is too tall for
the distributor, etc. If the sensor or magnets are too high or low, no signal
will result and the engine won't fire. It's possible that the vertical alignment
of the magnet sleeve and the ignition module's sensor is off. Generally, the top
of the black magnet sleeve should be slightly above the top
of the bottom-most step of the red ignition module.
The distributor shaft should spin freely, without dragging, when the distributor
is out of the car, and magnet sleeve, rotor and distributor cap are installed.
If the rotor is too tall, about one mm or so can be ground from the bottom of
the rotor button, allowing the distributor shaft to spin freely. A belt sander
or rough sandpaper on a flat, smooth surface can be used to grind a little off
the bottom of the rotor.
3. Distributor shaft height is too high or low, indicating too many or not
enough spacing shims are installed in the distributor. Over time, the
distributor shaft shims can wear out, causing up-and-down (axial) sloppy shaft
movement and misalignment of the sensor and magnet sleeve. If the rotor doesn't
extend far enough down to keep the magnet sleeve in place, you may need to use a
zip-tie, tightened very snugly, around the distributor shaft, on top of the
magnet sleeve, to keep the magnet sleeve in place, to prevent the magnet sleeve
from sliding up too far, where the magnets don't align with the ignition sensor.
Many distributors have distributor shafts
that may vary in height, depending on the wear, number, and thickness of the
distributor shaft shims inside the distributor.
A small oval plate and metric hex-head screws may have been included with the
ignition kit in case you need to boost the height of the red ignition module to
align with the magnets inside the magnet sleeve.
An O-Ring may have been provided to raise the height of the magnet sleeve, if
that is needed instead. Install the O-Ring around the distributor shaft,
underneath the magnet sleeve.
4. The voltage, measured at the coil's + terminal, should be near battery
voltage, or about +12.5 volts. If not, a wire can be run, on a temporary-only
testing basis, directly from the battery's + terminal to the red ignition
module's red wire. Do not leave this temporary wire attached for longer than a
minute
or so, while the engine is not running.
Wiring Installation Basics:
1. Begin with a fully-charged battery. Turn on the ignition switch. With engine
not running, using a voltmeter in the 20 Volt DC mode, check that the voltage,
measured at the coil's + terminal, is around +12.5 volts, about the same as
battery voltage. The red voltmeter lead should touch the coil's + terminal while
the black voltmeter lead is touching engine ground. If voltage reading is too
low or there’s no reading, the battery’s terminals or ground connection may be
corroded and need cleaning. Some vehicles have a resistor wire running from the
ignition switch to the coil’s + terminal. If this resistor wire drops the
voltage below 10 volts or so, you may need to run a non-resistor wire from the
ignition switch to the coil’s + terminal. Make sure that the ignition
switch terminal to which you connect this wire has power only when the ignition
switch is in the ON position.
Or, you can, for temporary testing purposes only, run a wire directly from the
battery's + terminal to the Hot Spark ignition's red wire
and the black Hot-Spark wire to the coil's - terminal.
Do not leave the wire from the battery connected to the red ignition module's
red wire for
more than a minute or so without the engine running. Neither the coil's - or +
terminals should ever be connected to engine ground (earth).
2. Remove the points, condenser and the condenser's wire from the vehicle.
To get the ignition running initially, only these wires should be attached to
the coil's + and - terminals:
A. +12 volts from the ignition switch (+12-volt power source) to the coil's +
terminal
B. Red Hot-Spark wire to the coil's
+ terminal
C. Black Hot-Spark wire to the coil's - terminal. DO NOT touch any
+12-volt wire to the coil's - terminal.
D. The automatic choke and fuel shut-off valve may also need to be attached to
the coil's + terminal.
E. Generally, only the black Hot-Spark wire is attached to the coil's -
terminal. If a tachometer wire is usually attached to the coil's - terminal,
don't attach it until the timing has been set and engine is running properly. No
other wires, except for +12 volt from the ignition switch to the coil's +
terminal, should be connected to the coil's + and - terminals at this time.
F. Attach a stroboscopic timing light to the spark plug wire of Cylinder number
1. With engine rotated to TDC (0 degrees) on the firing stroke of Cylinder
number 1, ignition switch ON, turn the distributor until the timing light
flashes. Start the engine. You may need to turn the distributor left or right, a little at a time, until the engine will stay running, so that you can
set the timing with the engine running, using a stroboscopic timing light,
according to factory specifications.
G. For testing purposes, no other wires should be attached to the coil
terminals, except for the center high-tension lead to the distributor cap.
Test Maximum Charging System Voltage: If the charging system voltage, measured
at the coil’s positive terminal, is more than 13.9 volts at any RPM level, the
voltage regulator likely needs replacing. Too much voltage can damage the
ignition module and other electronic components. A maximum charging system
voltage of 13.5 volts or so is plenty. A quick fix would be to wire a 1.4 Ohm
external ballast resistor between the ignition switch (+12 volt supply) and the
coil's + terminal.
Air Gap between Magnet Sleeve and Ignition Sensor: Should be somewhere
around 1 mm (.040 inches), but the exact gap is not critical, it can be more or
less, as long as the magnet sleeve doesn't rub against the ignition sensor and
you can see daylight between all spots on the magnet sleeve and ignition module.
Turn on the ignition switch. With a stroboscopic light attached to Cylinder No.
1's spark plug wire, point the light at your eye. Have an assistant crank the
engine over using the starter motor. The timing light should flash, again and
again. If the stroboscopic timing light flashes, then the ignition module is
working; the timing is simply out of adjustment.
Timing: Set the timing to factory specifications, engine running, using a
stroboscopic light attached to Cylinder number 1's spark plug wire. Because the
electronic ignition module is mounted in a slightly different position than the
points were, the distributor will possibly have to be turned as much as 20 to 30
degrees from where it was with points. You'll definitely have to reset the
timing, using a stroboscopic timing light.
The difference in distributor position with points vs. electronic
ignition can be as much as 30 degrees or so clockwise or counterclockwise, so
you’ll definitely have to reset the timing. The old method of setting the
timing statically, using a simple 12-volt test lamp, doesn't work with
electronic ignition, as it did with points. The only way to bench-test a
distributor is by using a distributor testing machine. In other words, the
distributor needs to be mounted in the engine and tested and/or timed using a
stroboscopic timing light, connected to number one cylinder's spark plug wire.
Testing the ignition kit with a stroboscopic light: A simple way to test the
ignition kit is to connect the stroboscopic timing light to the high-tension
lead connecting the center terminal of the coil and the center terminal of the
distributor cap and point the light at your eye while someone cranks
the engine over. The light should flash repeatedly. If the light flashes
repeatedly, then it should be simply a matter of setting the timing, with the
engine running.
Vacuum-advance Distributors: Check to see if the vacuum advance is working
properly by sucking on the vacuum canister port. The breaker plate should move
smoothly and freely.
Magnet sleeve positioned too high: Situation: The fit between the
distributor shaft and the magnet sleeve is especially tight and you can't slide
the magnet sleeve down onto the distributor shaft all the way. The rotor rides
too high, causing the distributor cap to wobble when you rotate the distributor
shaft by hand. Fix: Rotate the magnet sleeve so that it lines up with the lobes
of the distributor shaft cam and the magnet sleeve can slide down a bit. Install
the rotor and tap, with a small plastic mallet, very gently, on the center of
the rotor, until the magnet sleeve seats firmly onto the distributor shaft, over
the distributor cam lobes. With the rotor and distributor cap installed, you
should be able to rotate the distributor shaft without the distributor cap
wobbling. The shaft should turn freely, without any feeling of drag. If the
distributor cap still wobbles, you may need to adjust the number or thickness of
the distributor shaft shims, inside the distributor. If the rotor doesn't extend
far enough down to keep the magnet sleeve in place, you may need to use a
zip-tie, tightened very snugly, around the distributor shaft, on top of the
magnet sleeve, to keep the magnet sleeve in place, preventing the magnet sleeve
from sliding up too far, where the magnets don't align with the ignition sensor.
With some Chinese-made, knockoff 009 distributors for VW, once the magnet sleeve
and rotor have been installed and tapped down as far as they'll go, the rotor
rides too high, causing the distributor shaft to turn stiffly and/or the
distributor cap to wobble. In this case, the distributor needs to be
disassembled, a distributor shaft shim removed from inside and a shim added to
the outside of the distributor, onto the shaft, between the distributor body and
the distributor shaft drive gear. Or a simpler solution would be to, using a
belt sander or a piece of coarse sandpaper on a perfectly flat surface, sand off
about 1 mm from the bottom of the rotor. You should use a micrometer to measure
before and after shortening of the rotor height.
Magnet sleeve fit too loose: If the fit between the distributor shaft
lobes and the magnet sleeve is too loose, the distributor shaft may be worn down
from years of the points block rubbing on the distributor cam lobes, with
accumulated dirt and grit, and/or insufficient lubrication. If the fit is
especially loose, the best solution, short of replacing the distributor, may be
to wrap the distributor shaft lobes, several times, with Teflon thread tape,
before pressing the magnet sleeve down over the lobes. Too loose a fit between
magnet sleeve and distributor cam lobes may result in erratic timing. If there
is a gap between the bottom of the rotor and the top of the magnet sleeve, you
may need to tightly fasten a zip-tie, on top of the magnet sleeve, to ensure
that the magnet sleeve remains seated properly, to keep the magnet sleeve from
sliding up too far.
Testing the Hot-Spark Red Ignition Module with an
Ohmmeter
To test the Hot-Spark red ignition module, you'll need a digital multi meter
capable of measuring 20K Ohms. Almost any inexpensive digital multi meter should
work. Harbor Freight sells them for US $5 to $20.
Disconnect the two ignition module wires from the coil.
Set the multi meter to the 20K Ohms setting (not in the "auto" setting).
With the red Ohmmeter lead connected
to the red ignition module wire, touch the the black Ohmmeter lead to one of the
two screws securing the red ignition module to its base plate. The readout
should be somewhere between 9.4K (9,400 Ohms) and 9.7K (9,7000 Ohms). If the
reading is around 2.5K Ohms, the polarity ( + and - ) was most likely reversed
during installation.
Probable causes for ignition module failure include too much charging system
voltage (more than 14.0 volts at 2,500+ RPM), using a coil with too little primary
resistance (less than 3.0 Ohms for 4- or 6-cylinder, or less than 1.5 Ohms for 8-cylinder engines), reversing the red and black ignition wires on the coil,
touching a +12 volt wire to the coil's - terminal while the ignition kit is
connected to the coil or leaving the ignition switch in the ON position for more
than a minute or so, without the engine running.
Problems with Early 12V Signal Style Tachometers
If your tachometer needle is bouncing or reading too high:
If the car’s tachometer RPM reading is too high when the engine is running, or
the tachometer works OK to a certain RPM, then stops or starts reading
incorrectly, we recommend installing a resistor in line with the tachometer wire
and coil's negative ( - ) terminal. This helps to lower the voltage spike at the
coil's negative terminal to resemble a set of points, allowing the tachometer to
read the ignition module's signal correctly.
The type of tachometer will determine which resistor is needed. We have found
that a 10K ohm ½ Watt resistor fixes most problems and suggest starting with one
of these. If you find it doesn’t fix your problem, you might need to use one
with higher resistance, like a 15K ohm ½ watt or 20K ohm ½ watt.
A resistor will work in the vast majority of applications, but there are a small
number of tachometer designs that will require a capacitor. We recommend using a
.01 Microfarad 500VDC or 1000VDC capacitor.

Using Hot-Spark Ignition with VDO Tachometer:
Connect a diode #1N4005 between the negative terminal (- or 1) of the coil and the wire that goes to the tachometer. The cathode end (silver band) should be nearest the tachometer side, not the coil side. You should be able to buy a diode #1N4005 at Radio Shack or other electronic supply store.
Click here for Hot-Spark Ignition Installation Instructions
© 2005-2025 Hot Spark®